

Most traders think they’re ready to take a trade when their setup appears. But they’re not.
They haven’t accepted the risk.
They haven’t asked themselves: “Am I willing to take this loss — in full — and still feel good about executing my system?”
If the answer is no, you’re not ready to take the trade.
Trade 9 of 20 – Executed Exactly to Plan (✅ TP1 Winner)
We’re now on trade 9 of 20 in our commitment to follow the BoS Sniper Strategy without deviation.
We’re risking $150 per trade, across 5 TopStep accounts. That’s $750 of risk every single trading day. And over this 20-trade sample, we’re completely comfortable with the idea that we could lose all 20 trades — which would amount to $3,000 in total risk.
Is that likely? No. But if you’re not willing to accept that possibility — in full — then you shouldn’t be trading. The second you hesitate or trade emotionally, you’ve already lost. This is why risk acceptance isn’t a mindset cliché. It’s the foundation of every system-based trader’s success.
- ✅ 4 wins (including today’s TP1 hit)
- ❌ 4 losses
- ➖ 1 breakeven
That’s a 50% win rate so far — and we’re completely fine with that. Why? Because every trade is executed the same way, with the same rules, and the same edge. We’re not here to chase perfection. We’re here to test and refine a system — and that requires consistency.
Pre-Market Prep: Marking the Zones
At 9:00 AM, we had everything marked:
- 🟥 1-hour and 15-minute liquidity zones
- 🟨 A clear 1-hour fair value gap
- 🟨 A new week opening gap
These were the high-probability zones we expected price to react to. The setup began before the bell rang.
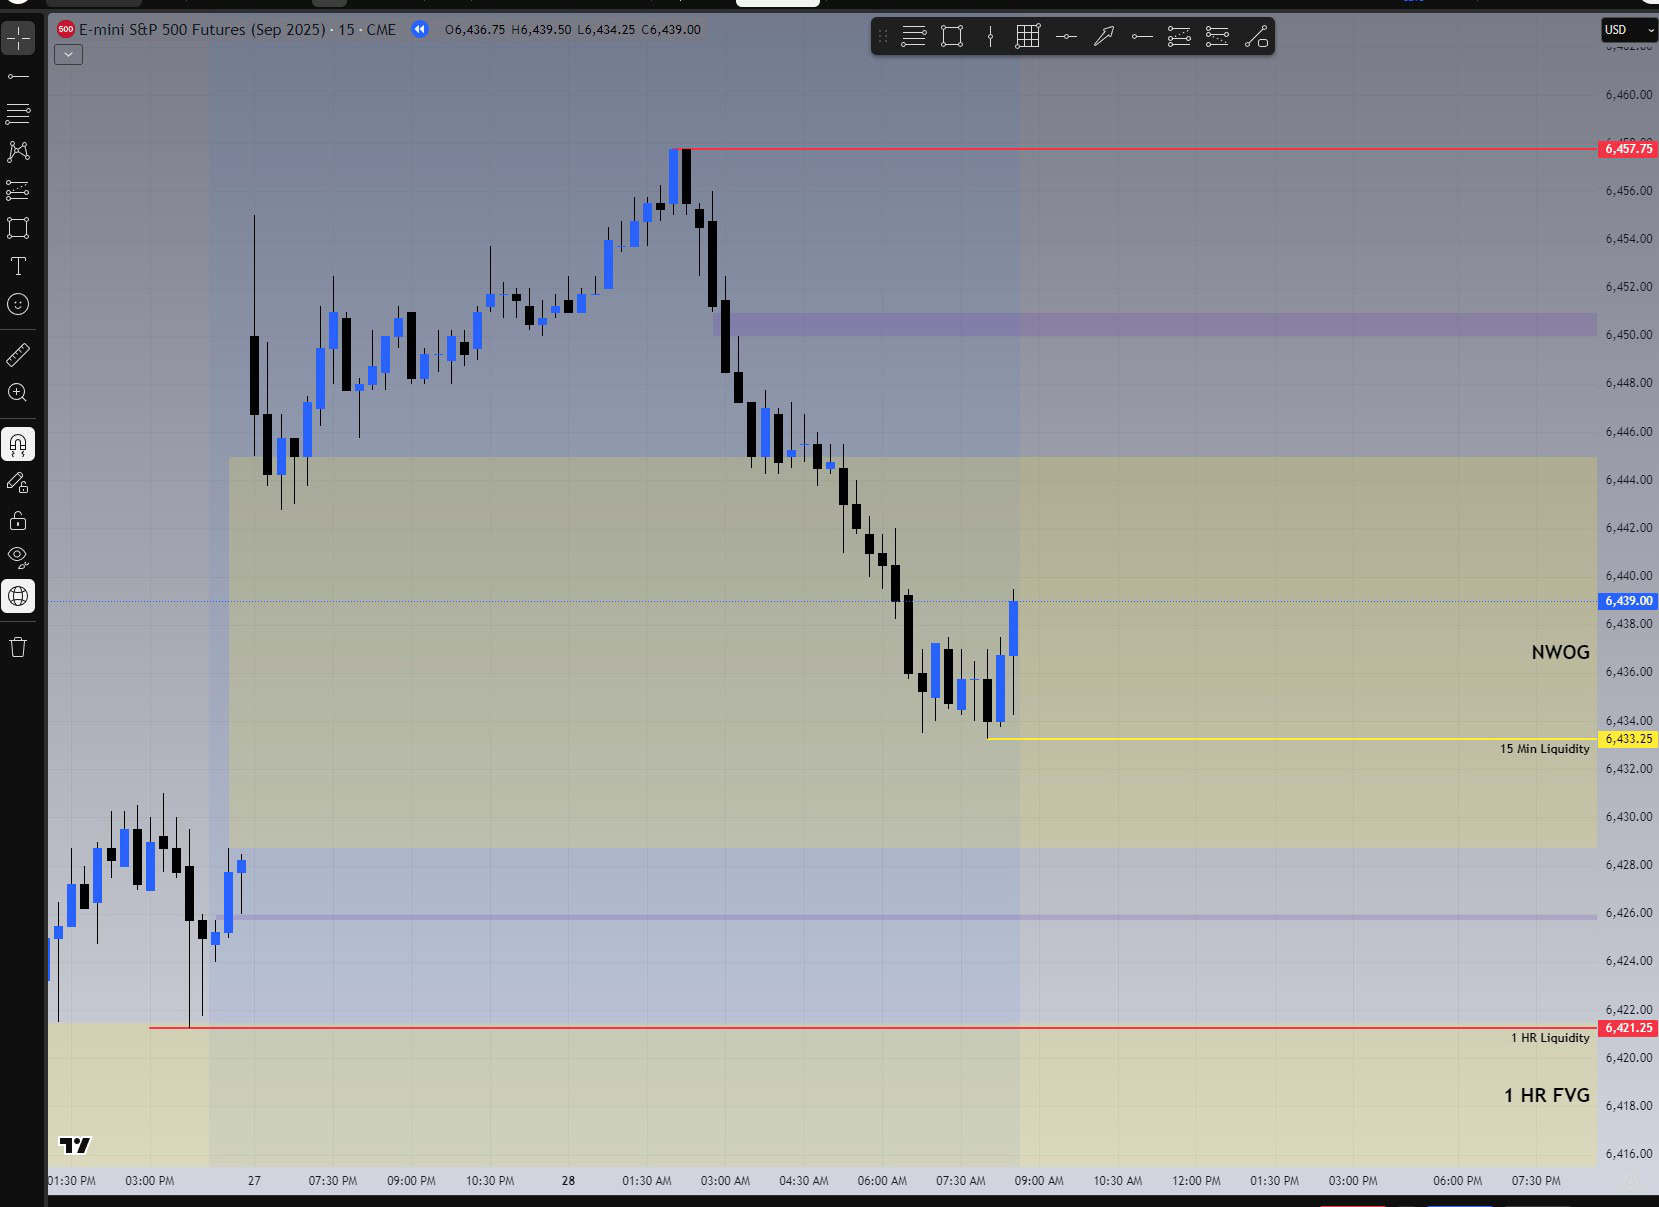
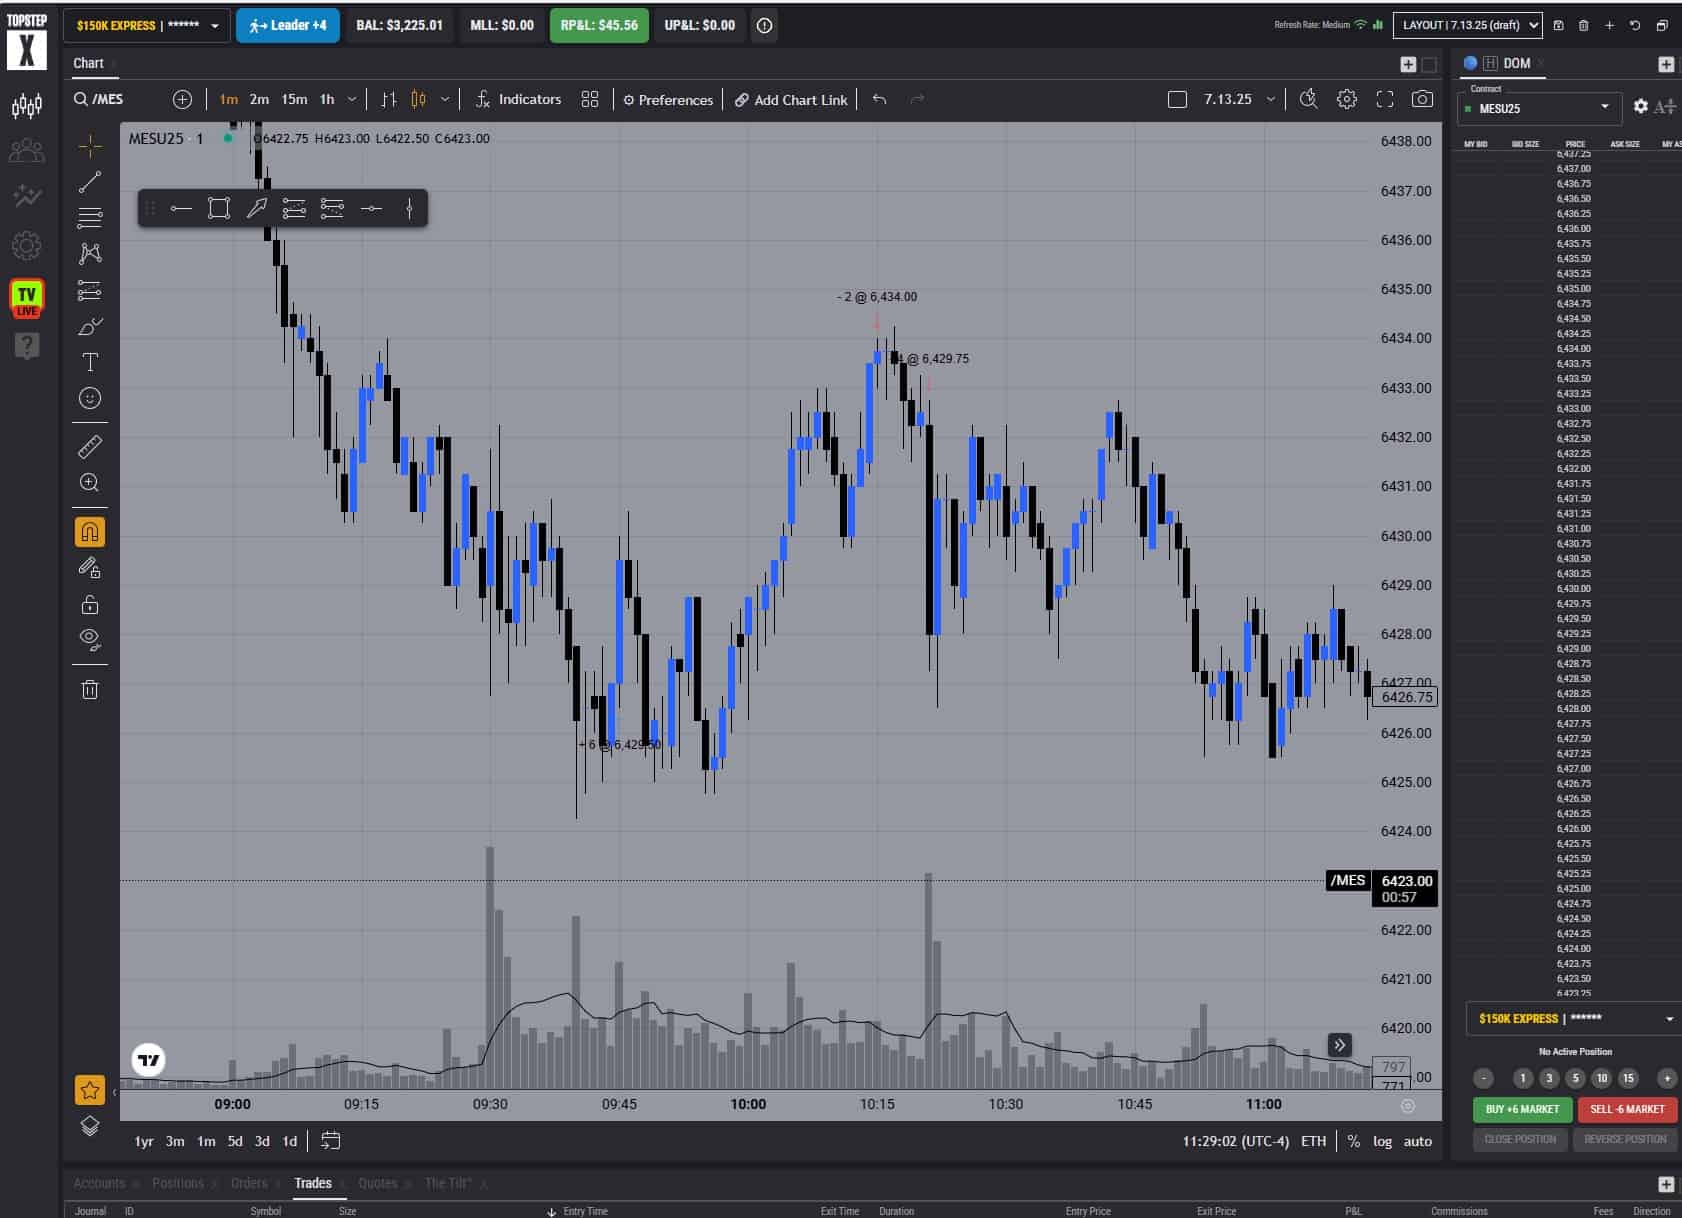
Trigger 1 – Price Taps the Gap
At market open, price dipped straight into the new week opening gap. This was our first trigger.
![]()
This reaction told us: it’s time to drop to the 1-minute chart.
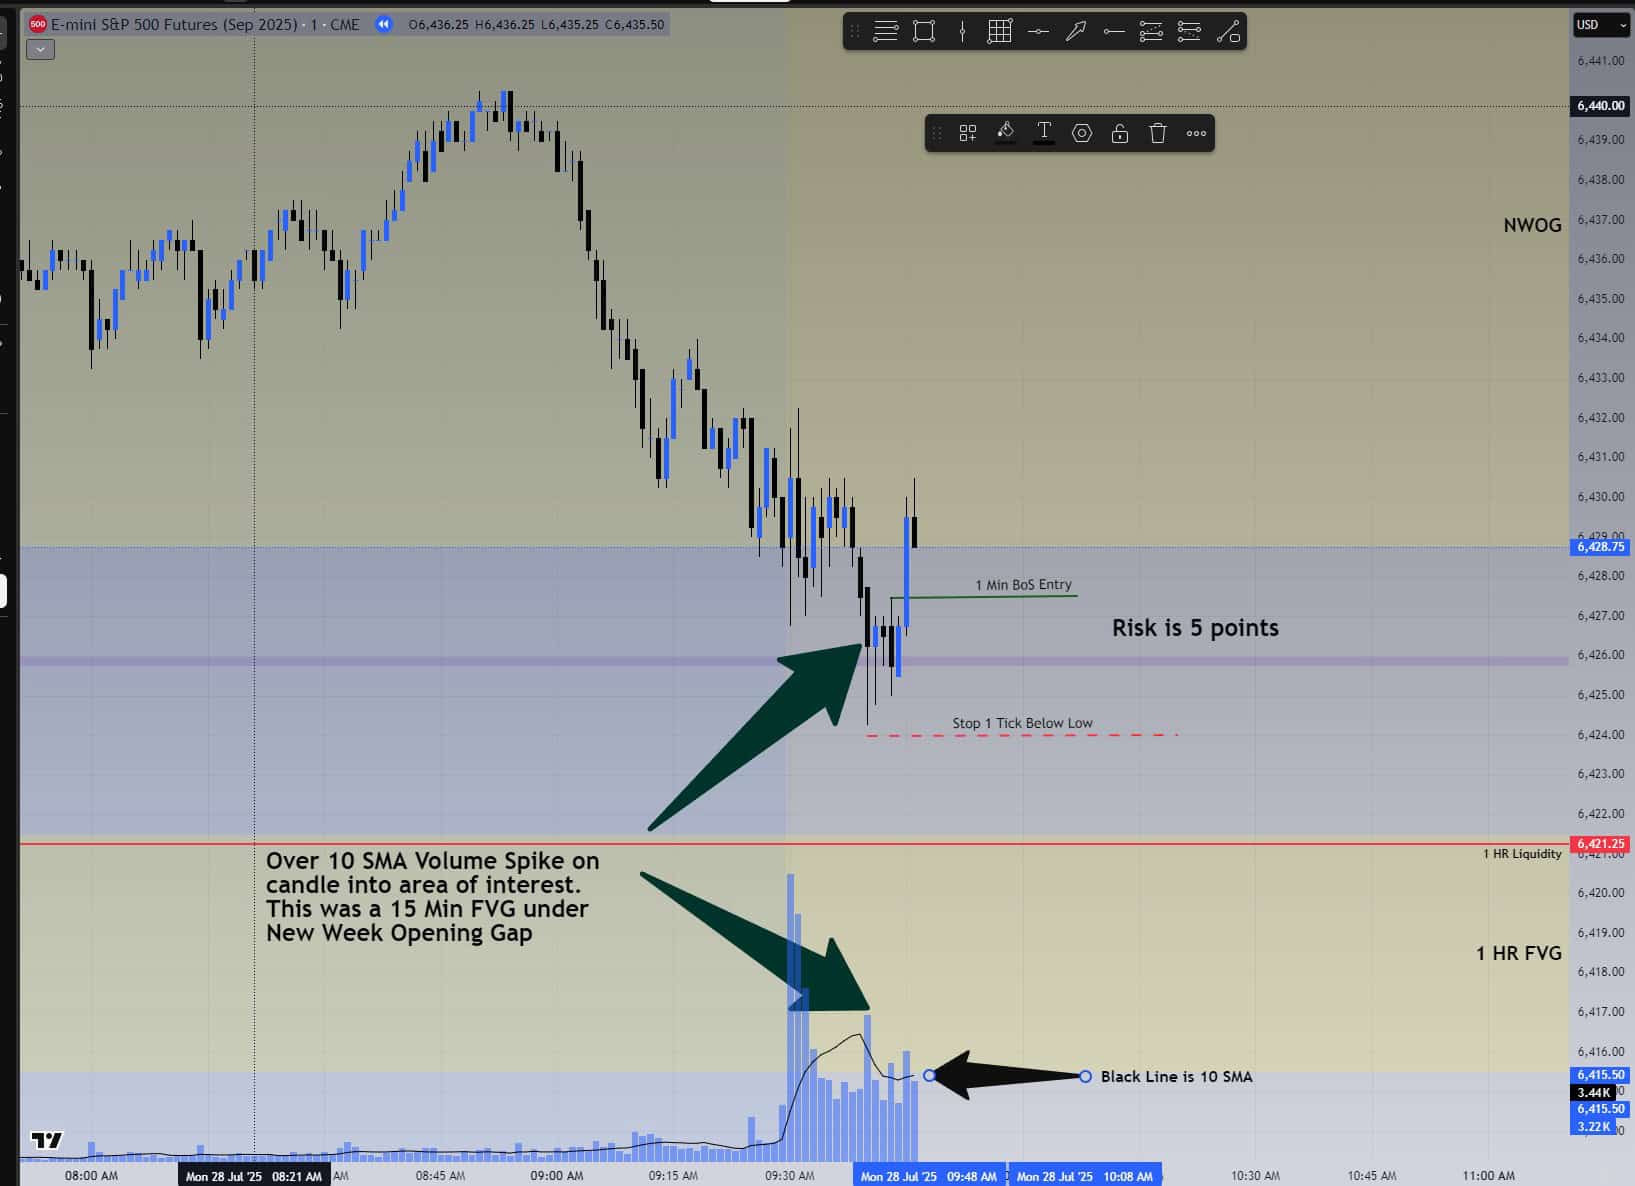
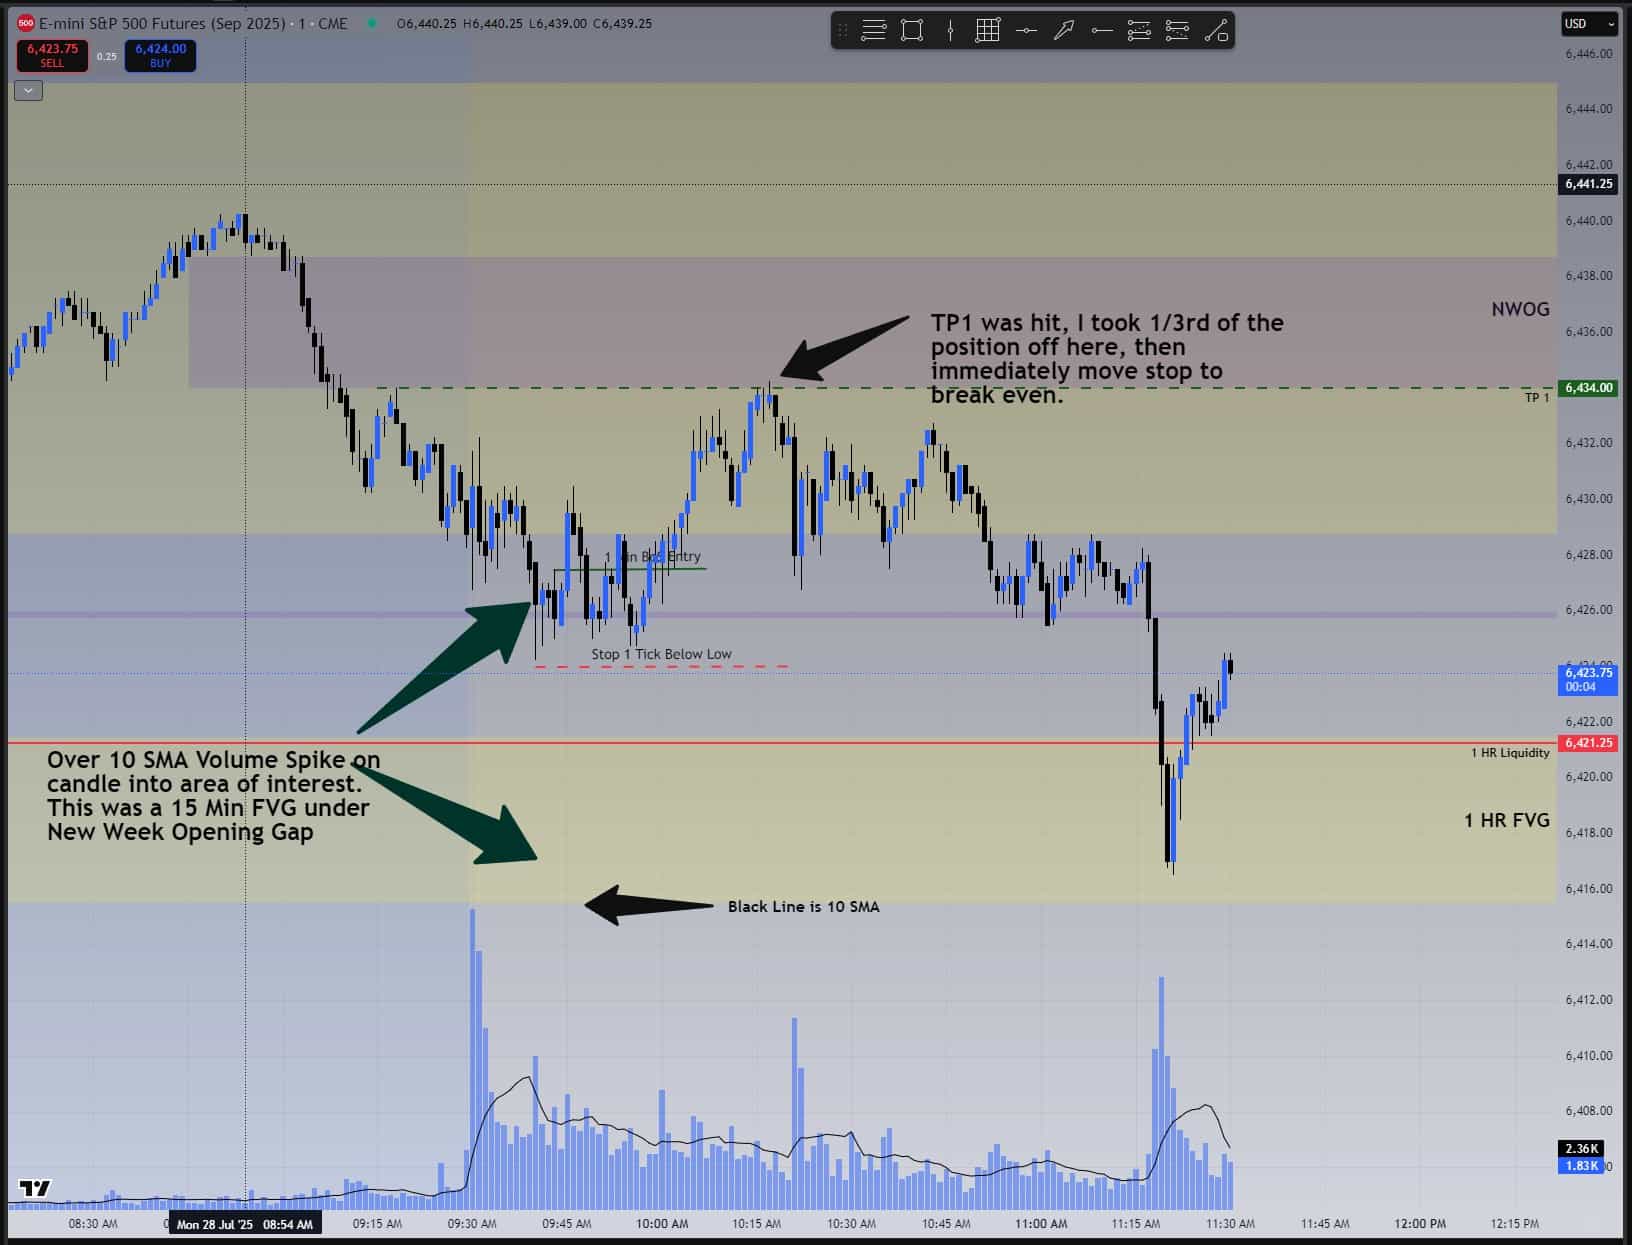
Trigger 2 – Volume Spike + 1-Minute BoS
As we dropped to the 1-minute, price moved through the gap and tapped into the 15-minute FVG. That’s where we got our real signal:
- 📈 Volume spike through the 10 SMA
- 🟩 Immediate break of structure (BoS) in the opposite direction
- 🎯 Risk defined: 5 points
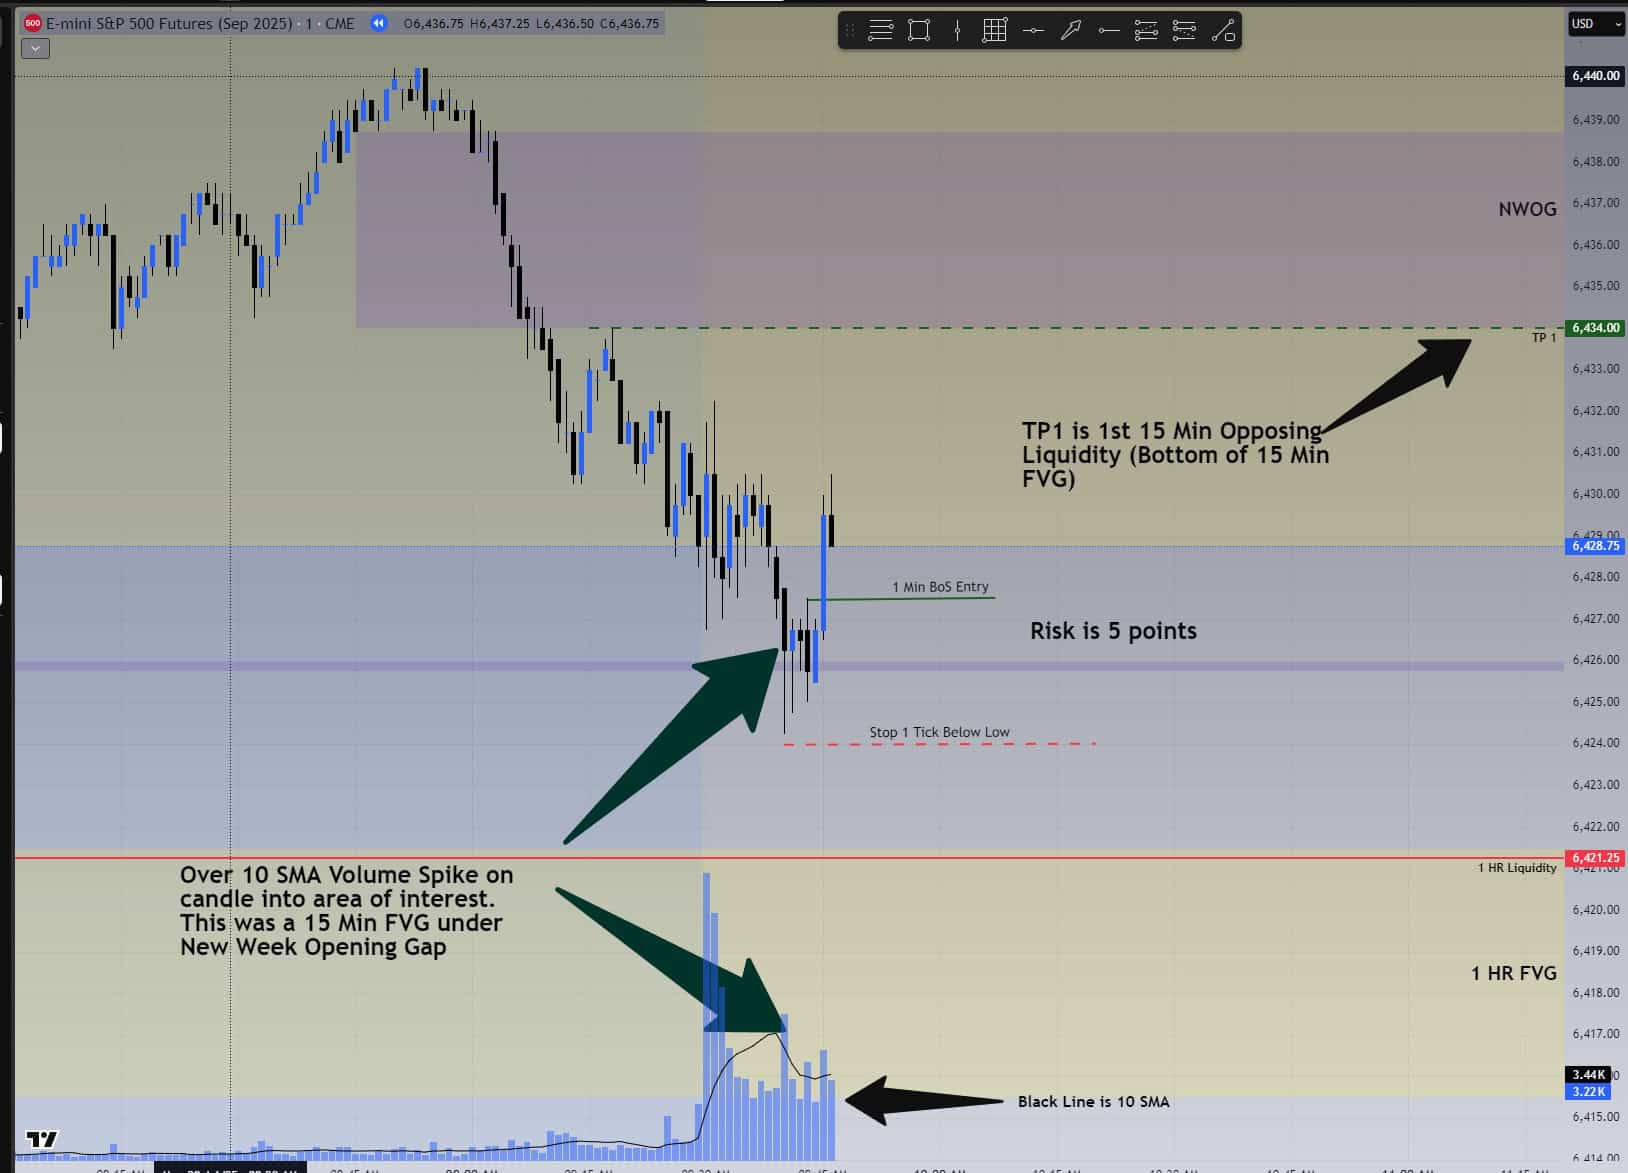
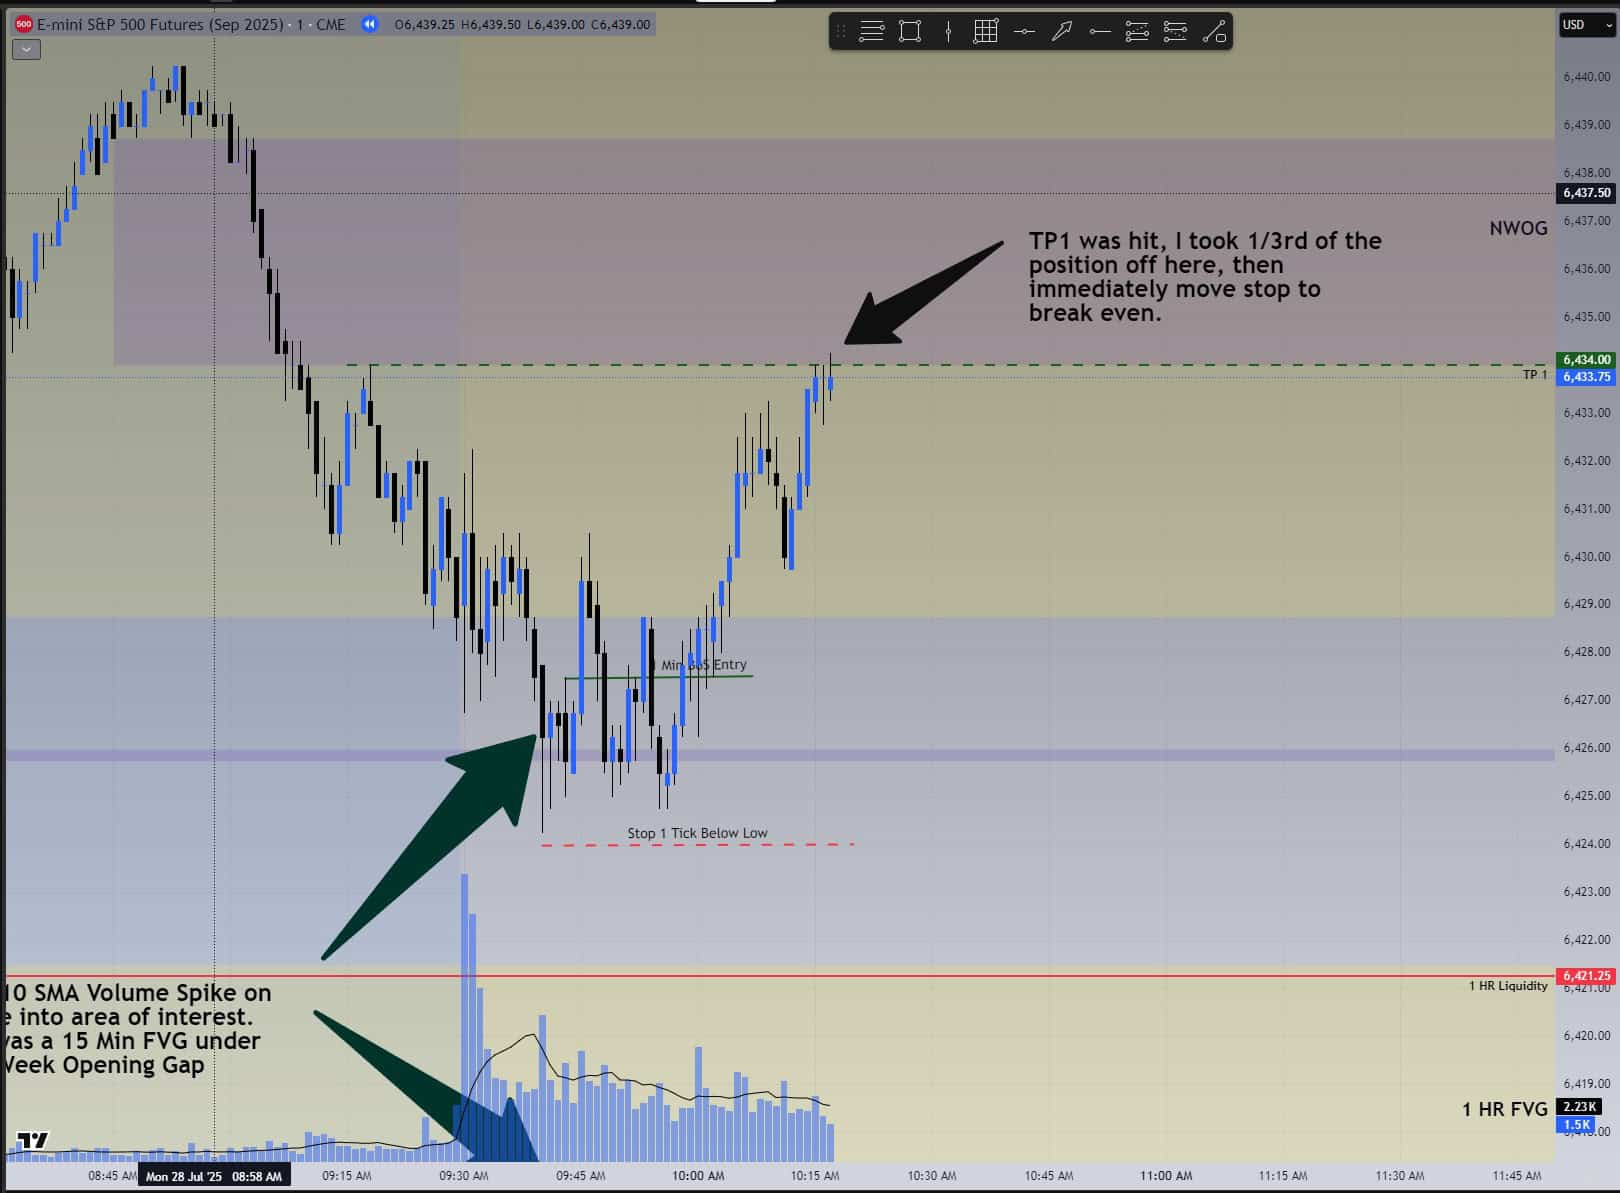
TP1: Opposing Liquidity Hit (✅ Profit Secured)
Our first target was the bottom of the 15-minute fair value gap — a clean, pre-planned liquidity level.
Price tagged it perfectly. We closed ⅓ of the position and moved the stop on the rest to breakeven. This locked in a profitable outcome and made Trade 9 a clear win.
Executed Across 5 TopStep Accounts
We’re not just trading this on one account. We’re executing the same setup across five TopStep funded accounts.
Everything you’ve seen in the charts above was mirrored in real trades — real money, real discipline, real results.
The Rest Was Stopped at Breakeven
As expected — or rather, as accepted — the market reversed hard after TP1.
We didn’t panic. We didn’t deviate. We followed the system, secured partial profits, and protected the rest. That’s a textbook execution.
This Is the Work
If you can’t emotionally handle taking a full or stop — you’re not ready to take the trade. No moving stops after the trade is placed, period.
When I take a setup, I’ve already accepted the loss. That’s the only way you can make objective, edge-based decisions in this business. The second you hesitate, second-guess, or override your rules — you’ve lost your edge.
This was trade 9 of 20 — and it was a confirmed TP1 winner. We’re not changing a thing until all 20 are in. After that, we analyze, refine, and grow. That’s how professional systems are built.
Final Word
You don’t need to predict the future.
You just need to identify the zones where reactions are likely — and build a system around them. Then? Follow it to the letter. That’s how you grow consistency and confidence as a trader.
I’m doing it across five accounts. You can do it too.
But only if you’re willing to accept the risk.